Showing posts with label embellishments. Show all posts

Tuesday, May 5, 2015

What are Felties?!?!?!?!


Felties....Felties....What in the heck is a Feltie??????


Let me break down the Feltie Madness for you!!!

Felties are Felt appliques that you can use for multiple crafting uses!!!! They are machine embroidered felt embellishments that can come in an array of designs, colors, and sizes. Felties consist of a front felt piece that is backed by a 2nd felt piece to hide the thread from the front piece. You will often find stabilizer in the middle to give the felt applique extra support.


What would you use a Feltie For?????

These appliques are a great way to embellish just about anything you would want.
  • You can use them in the center of your hair bows or on a hair clip
  • They are great for felt Tic-Tac-Toe game pieces. 
  • If you are having a themed birthday party or shower you can use them as cupcake toppers. 
  • They make great scrapbooking and card making embellishments.
  • You can embellish a crochet/knitted hat or headband with them. 
  • They can also make a great embellishment on those can cozies
  • You can also glue them on to magnets or pin backings. 


There are so many more other great ways you can use them. 


Misc Feltie Info.....
The average size of the feltie runs around 1.25 inches to 2 inches. 

Here are a few of my samples that I have made. All my designs were digitized by me made from graphic designs from a variety of graphic artists. 


Special Notes about choosing colors for your Felties!!!!

*You can find a special list of felt colors HERE. 


*I also wanted to show you how choosing the right color choices can make a difference in the way your feltie will look.


~Shop for Felt Appliques

~Shop for Felt Hair clips


If you ever have any Feltie questions please feel free to message me.
I am excepting custom orders. Please note that there will be a small designing fee included in your custom order.


Thursday, March 1, 2012

Local Shout-Out!!

In light of Stamp Week I was tooling around on Facebook and came across a great Facebook Shop Page for Homemade Cards, Bookmarks and other great items. Seeing how this is about as far as I have dipped my toes into the stamping world. I was truly amazed with this young girls talent. Kayla is just starting out into the blogging world and I wanted to give her a shout out. She is one of our local crafters and I always try to give our local community some much needed love.

If you get a chance go on and check out everything that Kayla has to offer. You can find her stuff for sale on Facebook and you can get there by clicking on her logo or by clicking here. You can also check out her blog page here at http://kaylas-kreations.blogspot.com/.


 Here are some other cool items she has in her shop. You all know I have a soft spot for owls. Ha Ha!


Remember we have a Mystery Stamp Giveaway (Valued at $25.00) going on here this week. Click here or on the Giveaway Button found on the sidebar to get the details on how to enter.

As always Happy Crafting!!


Saturday, February 18, 2012

Candle Burning

This is an amazing project but requires practice and patience, as you can easily melt the candle while trying to add an image, or make it bubble just as I did!
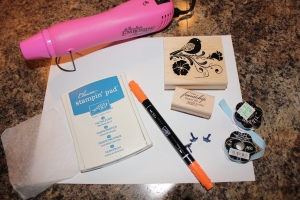
What you need
  • candle
  • tissue paper
  • heat tool
  • ink/stamping markers
  • stamps of any kind
  • embellishments such as brads, ribbon, fabric flowers (or crochet)


First, stamp your preferred image on the tissue paper on the SHINY SIDE using ink pads or stamping markers. When using multiple colors of markers on stamp, "huff" it when completely covered with ink. ("Huffing" is a stamping term meaning you'll be breathing as hot of breath on the stamp to moisturize it.)


Second, cut out stamped images as close as possible to edges.


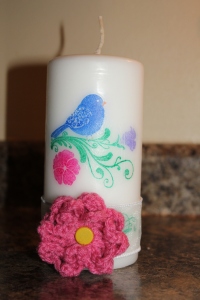
Third, using heat tool CAREFULLY heat image on candle. As it heats, you will notice is starting to melt into the candle. If you heal it too much, the candle will bubble and melt too much, just as the picture to the right did. Hold the heat tool approximately 12 inches back but continuously heat the image. It may take several minutes.

Fourth, add any embellishments once all your stamped images are in place.

PLEASE NOTE: IF USING ANYTHING BURNABLE, IT MUST BE REMOVED BEFORE BURNING THE CANDLE!!


My blue candle didn't turn out. As you can see by the picture, the wax paper didn't melt completely into the candle and, its hard to tell by the picture but I burned the word 'sparkle' too much and it misshaped the candle.


Front of candle


Back of candle


As I love to crochet, I added a crocheted flower but you can add fabric flowers as well.

This project is great for wedding favors by purchasing a personalized stamp with names and date stamped on a smaller candle!


Hope you enjoyed this project and find it as fun as I did to do!


Until next craft...


Friday, February 17, 2012

Bead Bling!

Hi everyone! I wanted to share this craft with you. I did it a while ago and made a set for myself as well as each of my children's grandparents for their frig and everyone loved them!!
This is a quick fun craft that is great for a gift. Pictures can be used but also paper, designs, drawings.... there are so many possibilities!!
Image
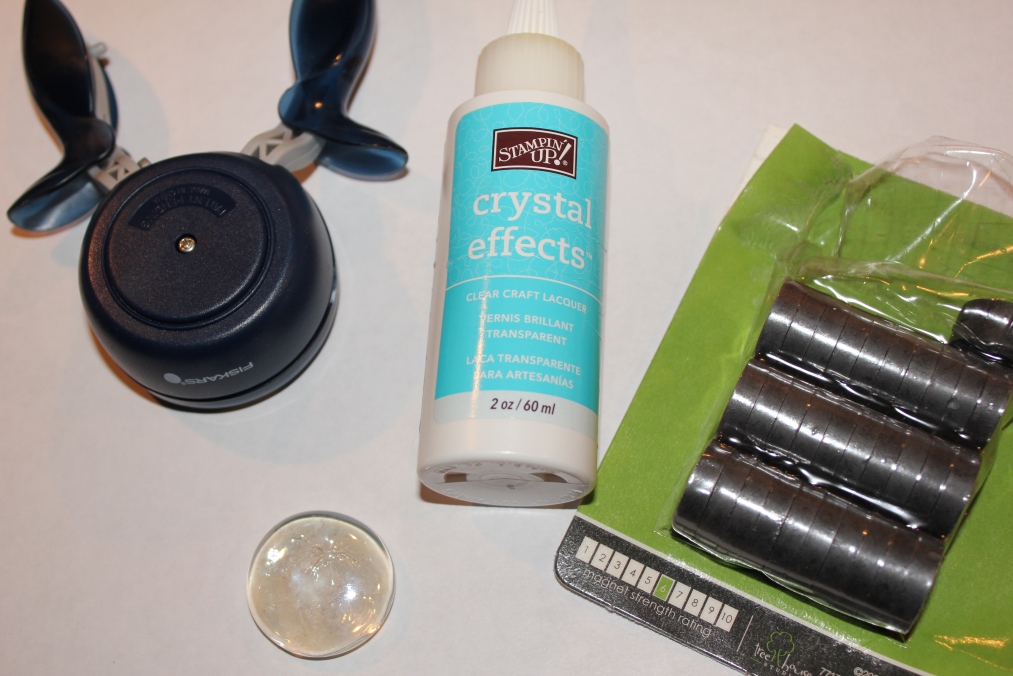
Items you need
What you need...
  • 1 1/4 inch flat clear circular beads (I bought mine from Hobby Lobby in the wedding section.)
  • any clear all purpose glue (Crystal Effects from Stampin' Up works great. The glue will make the picture more visible when it actually adheres to the gem.)
  • 1 1/4 inch circular punch
  • magnets (I used magnet 6 strength~ it was strong enough to hold paper on the a frig but is on the thicker side. You can also use cut sheets of magnetic paper but it won't be able to hold anything.)
  • Pictures/paper/design or anything you want to show threw the bead
First, use your circular punch to punch out the image you want to add to the bead. (A great tip I learned in stamping class is to always punch backwards so you can see your image as you punch it! It sure helps people like me that can't keep things straight!)
Second, put a SMALL amount of Crystal Effects on FRONT of picture (or any other clear glue that you may find to work.)
Third, firmly press image on back side of clear bead and hold for several seconds. It's best to let it dry completely before next step.
Fourth, put a small amount of Crystal Effect on BACK side of picture.
Next, press magnet where you just placed glue and hold firmly for several second. Let dry overnight. (Keep checking bead as they may start to slip before glue is dry completely, you may have to recenter.)
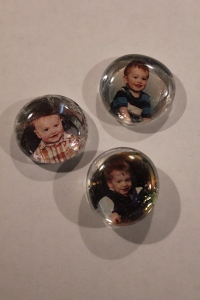
The picture below is what I made for myself and the kids' grandparents...
The picture below is what I made in a stamping class the first time ever doing this craft and it was actually just a small part of bigger project... maybe one day I'll post the entire thing! The background is just paper punched out!
 Hope you enjoyed this!
Until next craft...

Beaded Flower


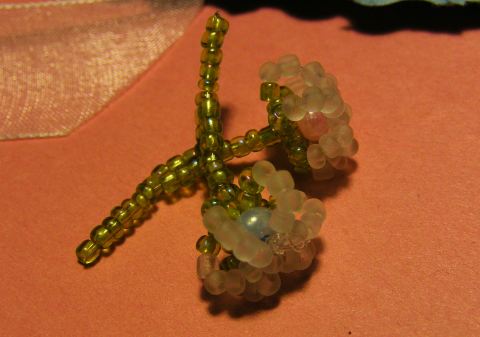
Recently I acquired a bunch of seed beads. For a couple of days I sat there sorting out the colors and just couldn’t decided what to do with them. After searching through some of my books I came across a beaded flower and tried it out for myself. I just wanted to show you the results. I thought it turned out pretty nicely. The little flowers are easy to make and they probably only take about 5-10 min a piece. They are small and can be used for many different types of crafting projects.
If you are interested in learning how to make these cute little embellishments leave a comment with your email address and I will send you a tutorial.


Happy Crafting

Looking Forward.....

As I sit here and dust off the cobwebs to my tiny ghost town of a blog, I am excited to make a fresh start and slowly get back to what...