Showing posts with label Sewing. Show all posts

Tuesday, January 16, 2018

Butterfly Charm Block - Week 10 (Final Week)


I can't believe it's done!!!! This has been a fun and very educational 10 weeks.
And I am so very pleased with how this project turned out.


I have to admit staring into the process of the project I was so nervous. I was so afraid of royally messing this part up. But once again it was not nearly as hard as I thought it might be.


I started out by cutting the butterfly squares down so they were all exactly 5 in by 5 in and then I cut up 6 strips of the black that were just over 5.5 in by 1.5in.


Next I cut 2 more strips of black that were about 18.5 inches long by 1.5 inches


For the Final pieces I cut 2 black pices inside at 18 inches by 2.5in  and 2 more at 24in by 2.5in. I can't wait to back it and put the border on but I am so very very happy with how this looks. And I can't wait until my next project with Crystal. Also make sure you stop by and see her finished butterfly wall hanging!!!!


If you would like to make your own  Butterfly Charm Block  Paper Piece  you can pick up the pattern by Lillyella stitchery


Tuesday, January 2, 2018

Butterfly Charm Block Week 9


OH MY GOSH!!!!! I can't believe this is the last butterfly to our project. This has been so much fun and I am so excited to say that I have started piecing it together.

If you have never done paper piecing before I honestly suggest just trying it out. We have had so much fun with this and it really is so easy!! I had never done paper piecing before we did this project but I checked out a  tutorial by Connecting Threads.  After I watched this a few times it has been super easy ever since!!!!


For those of you that are just tuning in My best Friend Crystal from Crystalized Designs and I have been doing a butterfly charm block sew along. We are using the Butterfly Charm Block  Paper Piece Pattern by Lillyella stitchery


I love how each individual butterfly turned out.  Well I hope you tune in next week to see it all put together!!!!


If you’re joining in on the sewing fun, I’d love to see! Feel free to post pictures on or tag me on any social media site!
Have a wonderful day!!!!


Monday, December 4, 2017

Butterfly Charm Block Week 6


We are 2/3 of the way done with our Butterfly Charm Block Sew A long!!!!!!!! 

For those of you that are just tuning in My best Friend Crystal from 
Crystalized Designs and I have been doing a butterfly charm block sew along. We are using the Butterfly Charm Block  Paper Piece Pattern by Lillyella stitchery.

If you have never done paper piecing before I honestly suggest just trying it out. We have had so much fun with this and it really is so easy!! I had never done paper piecing before we did this project but I checked out a 
 tutorial by Connecting Threads.  After I watched this a few times it has been super easy ever since!!!!


I know every week I tell you I love how that weeks butterfly turned out but this week I think is my favorite so far. I just really like how the pinks came together. These butterflies work up so quickly its a great project for those without a whole lot of time.

This next week I will be working with a dark blue color scheme. 


If you’re joining in on the sewing fun, I’d love to see! Feel free to post pictures on or tag me on any social media site!
Have a wonderful day!!!!

Monday, November 27, 2017

Butterfly Charm Block Week 5


I honestly Love Mondays lately lol. Every week I get to share a pretty butterfly with you to start the week out right! For those of you that are just tuning in My best Friend Crystal from Crystalized Designs and I have been doing a butterfly charm block sew along for a few weeks now. 5 to be exact. We are using the Butterfly Charm Block  Paper Piece Pattern by Lillyella stitchery. There are 3 different butterfly patterns to her pdf and I love them all!


For those of you that might be unsure of paper piecing I honestly suggest this amazing  tutorial by Connecting Threads.  After I watched this a few times it has been super easy ever since!!!!


I really love how my light green one turned out!!! This was the Gadget Pattern. I can usually work up each butterfly in about an hour or so.

I am really excited for next week's color. I will be using pink!!!!


If you’re joining in on the sewing fun, I’d love to see! Feel free to post pictures on or tag me on any social media site!

Have a wonderful day!!!!

Monday, November 20, 2017

Butterfly Charm Block Week 4

I LOVE MONDAY!!!!!!!!!!!! AND I LOVE BUTTERFLIES!!!!!!!!!


 If you are just tuning in we are using the Butterfly Charm Block  Paper Piece Pattern by Lillyella stitchery.

If you have never paper pieced before but would like to learn, I found an amazing tutorial by Connecting Threads.

And don't forget to stop by Crystal's Blog to check out her butterfly this week!!!!


This week I did my Yellow Butterfly. I had a few distractions this week while getting things ready for some of my family visiting this past weekend.

 I didn't notice till I pieced the last 2 pieces together that I forgot to cut off access fabric after each step. If you look really closely you might notice. Other then that I got this one worked up in an hour. I honestly just love how fast these work up. 


This next week I was supposed to be working up my teal butterfly however I have decided against my fabric choices so I am going to run to the fabric store and see if I can find some that I like otherwise there will be a mystery color!!!!!!!!!!!

If you’re joining in on the sewing fun, I’d love to see! Feel free to post pictures on or tag me on any social media site!

Have a wonderful day!!!!

Monday, November 13, 2017

Butterfly Charm Block Week 3


It's MONDAY!!!!!!!!!!!! Which means I get to show you another AMAZING Butterfly today. If you are just tuning in we are using the Butterfly Charm Block  Paper Piece Pattern by Lillyella stitchery.

If you have never paper pieced before but would like to learn, I found an amazing tutorial by Connecting Threads.

And don't forget to stop by Crystal's Blog to check out her butterfly this week!!!! (PSSST) This week she did my favorite color)

For this weeks Butterfly  I used the  Lucy's Crab Shack Charm Pack from Moda FabricsSo I have to admit this butterfly is special to me this week. There is a secret hidden within the butterfly!!!!!!!

This is the third butterfly in the collection of patterns that you get. This one is called Cricket. These honestly work up so quickly. And remember this project is the first time both Crystal and I have ever tried our hand at paper piecing.  It is just so much fun. I was able to get this butterfly done in just over an hour with minor distractions from the tiny humans.


Speaking of tiny human so when I was piecing this fabric together there was one block that had a ton of names on it and behold in one of the corners of this single fabric square is my threenagers name. So I knew I had to squeeze that tiny corner of that fabric into my butterfly.


Now the search is on.......I must find fabric that contains my oldest sons name.      

Stay tuned................ 


Here is the fabric for next week!!!

If you’re joining in on the sewing fun, I’d love to see! Feel free to post pictures on or tag me on any social media site!

Have a wonderful day!!!!

Monday, November 6, 2017

Butterfly Charm Block Week 2


Well Week 2 was a success. I had learned all my mistakes from Week 1 and really had no problems this week. If you are just tuning in and want to learn how to paper piece I found this amazing YouTube tutorial from Connecting Threads . We are using the pattern Butterfly Charm Block Pattern by  Lillyella stitchery. Also remember you can catch Crystal's weekly butterfly over on her blog Crystalized Designs.


So this week I did an orange butterfly. I have to be honest orange is not my favorite color in the world. And I really didn't have much to choose from in the orange color category in terms of fabric. However I really do like the way the colors started looking once I started piecing it together. 

There are 3 different butterflies to this pattern collection. So next week you will also see a slightly different layout. I am just in love with these patterns. And I honestly Can't wait to see it all done. I would have to say paper piece quilting is definitely a new hobby and I can't wait to do more projects after this. 


I love the fabric for next week. I will be using the light blue color out of the Lucy's Crab Shack Charm Pack from Moda Fabrics that I have been holding on to what seems like forever haha. 


If you’re joining in on the sewing fun, I’d love to see! Feel free to post pictures on or tag me on any social media site!

Have a wonderful day!!!!

Monday, October 30, 2017

Butterfly Charm Block Week 1

Well we did it!!!! We got through our first week on our very first paper piece project ever!!!!

So let me tell you a little bit about this week went down haha. At first I was super scared. I had all my pieces cut out and I sat there staring at them. I was just So intimidated.  Took a couple of deep breathes and took a swig from my soda and said...... "Let's do this".

So I thought I remembered to do everything I had watched on the YouTube tutorials that I found from Connecting Threads and I jumped in. Started on section A like the instructions said and put my fabric pieces behind it and away I start sewing on the line between section 1 and 2........ Yup ok something is off here..... Oh I forgot to make sure the fabric was facing the right directions.........Derp........Out comes the seam ripper.

*Note 1- Back of fabric 1 should be up against back of pattern. fabric 2 should be facing so both fabric pieces are facing right side of fabric together

This time I make sure my fabric is facing the right directions and away I start sewing again... restitching the line between 1 and 2 got to fold my paper to cut my seam allowance and realize section 2 fabric is facing the wrong way for the seam allowance and almost cut most the fabric off.................ooops Double Derp......Out comes the seam ripper once again.

*Note 2 - Make sure when placing your fabric pieces after the first one that they are just over the 1/4 inch seam allowance over the line into that section piece working from the previous section you finished.  ex when placing fabric 2 make sure the fabric is hanging 1/4 inch past the 2 line and even with your seam allowance from fabric 1 (hope that made sense)

At this point I went and re watched the videos like 3 times over haha. Ok lets do this again haha.

So after re watching the videos and taking a few more deep breathes needless to say I finally got it and OMG this paper piecing is SOOOOOOOOOO much fun!!!!! I am honestly really happy with how my first butterfly turned out.


I want to add that once I understood the first couple steps this project works up super quickly. If you have wanted to try paper piecing I suggest take a deep breathe and do it. You won't regret it. I can't wait to do more projects like this one.


OH one more thing......your Iron is your best friend in this project. Skipping out on the ironing step can make all the difference in the world when matching your seams up to piece your project together.


I am super excited to start the next one. Here is my color choice for next weeks butterfly.....

Also check out Crystal's Butterfly this week over at Crystalized Designs!! She also picked her favorite color for this weeks butterfly and it turned out beautifully!!


If you’re joining in on the sewing fun, I’d love to see! Feel free to post pictures on or tag me on any social media site!

Have a wonderful day!!!!

Monday, October 23, 2017

Butterfly Charm Block and a Bestie!!


For years my Best Friend Crystal and I love to do projects together and with me just coming back on to the scene I wanted to do something meaningful and fun!!


Our Favorite animal (insect) has been the butterfly so when I saw these amazing Butterfly Charm Blocks by  Lillyella stitchery  I knew I wanted to make that. So I wrote Crystal and said wouldn't this be fun!!! And so here we go!!!!


This will be my first time challenging myself with charm blocks by paper piecing I am super excited and scared all at the same time haha.


I did find a paper piecing tutorial by Connecting Threads that made me feel much better about taking on this project and now I am even more excited to dive in and start.


We are going to do a 9 square wall hang in a rainbow format. I am so excited to hang this in my office when it's done!! Each week we will share with you one of our butterfly blocks along with the next weeks fabric color choice. This week I am going to start out with my favorite color....Purple!!


We hope that you follow along and perhaps maybe even join along. See you next week and I will have my first charm to share with you!! You can follow Crystal's progress on her Butterfly Charm Blocks over on her blog Crystalized Designs


Saturday, October 21, 2017

Handmade Sweatshirt


ASweatshirt

Made With 


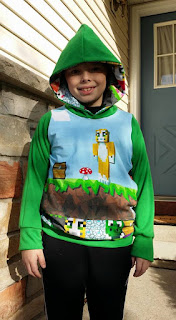
This past year I did manage to squeak out a few things for my boys.  I wanted to share with you one of my favorite things I think I have ever made so far.  My oldest has been a long time fan of the game Minecraft along with the YouTube guy called Stampylongnose.


A couple years back I ordered the most amazing Minecraft fabric and I sat on it for almost a year before deciding what was the best route for him and this awesome fabric. I eventually decided on throwing it all in and facing my fears to take over the biggest sewing project I have yet to try....... I made a sweatshirt!!


As the panel was not long enough to cover down to the waste band I used some of the square material that I used on the back of the sweatshirt and inner hoodie on the bottom front .

All in all though I think it turned out pretty good for my first major clothing project!!


Needless to say I had a very happy boy!!!


The Sweatshirt Pattern is All Ears Hoodie by Max & Meena

The Fabric was Ordered though (unknown at this time, I will update as soon I find out)

Saturday, February 28, 2015

Blog Stalkers Issue 2


Here we are at the end of February. The Blog Stalkers have been battling the sickies within each of their homes. Resulting in being a little behind on stalking blogs. However, we have some goodies for you. Don't forget to follow us on Facebook- https://www.facebook.com/blogstalkers
stephanie
"Hi there Stephanie here one of your friendly blog stalkers. So I am able to joke often about probably being America's worst cook. However I have found a blog that I love that is inspiring my inner cook (where ever that may be) I have a book mark list a mile long of recipes that I want to try from these amazing ladies. Have you tried any of their recipes? http://www.sixsistersstuff.com/
I'm a huge fan of It's Always Autumn! I love the variety of posts she writes, from holiday crafts to photography to food! After painting my home in preparation to attempt to sell, I kept all my pictures off the walls. I'm the type of person that love to have photos, art,
Crystalwording... anything that reminds me of the life I'm so grateful to have. So, this post by It's Always Autumn really caught my eye. I love how this instagram wall of photos looks and really want to do something like!
I also love that the photos can be changed easily. Swapping out photos is something I do regularly when my frames are up, but this would be easy! Check out her blog post to find out exactly how to accomplish this project by yourself!
lisa-270x300
My blog post find this month is perfect for anyone running a home business. Fellow crochet designer, Thomasina Designs helps us all out with some great advice on "Keeping Accounts." She includes instructions on setting up a spreadsheet to track of your money coming in and going out. Now is the perfect time to get your own income/expenses in order and see how your "really" doing.
Thank you for following us and looking forward to next months finds....
Until next month,
Stephanie, Lisa, & Crystal


Wednesday, January 30, 2013

First Stuffed Animal Pattern


First I would like to say I am sorry for being MIA lately. The cold and flu season hit our house hard and we have been battling to get it out since the week of Christmas. I think we are all FINALLY on the road to recovery.

I have to admit as a designer you may fail more times than you may like to admit but each time is a new learning experience. A couple weeks ago I shared with you how I go about making my sewing templates. On many occasions that technique has worked strait off the first try.  However taking on something like a stuffed animal I should have known that I might be in for a bit of a disappointment thinking I would get it on the first try.

I am not saying that my elephant looks horrible I am just saying the pattern could use some adjustments. But that is the good thing about using the process I use to design my patterns. It is so easy to go back to the drawing board to make those adjustments and then just cut out a new paper template. I had to share this with you though. It so important not to give up. Look at parts of what you don't like about something and try and fix it until you do like it.


I do look forward to getting this pattern down to perfection but it is fun to see the process along the way. 


Happy Crafting
Stephanie


Wednesday, January 23, 2013

Making a sewing pattern


Ever since I was 15 I had a passion for Graphic and Web Design, it wasn't until last year when DESIGNING became more than just a virtual world to me. With the encouragement of my husband and best friend I stuck my fingers into the world of pattern designing. My best friend in which I can comfortably say is a "Pattern Addict", is the one that finally talked me into it and I will forever be grateful to her for pushing me to do something with it.

My pattern designing started with crocheting and as I learned how to use my sewing machine I started cutting out my own paper templates for small sewing projects. This past fall I took the plunge into larger sewing patterns and designed my own basic beanie. I was looking at my sons old winter hat and thought to myself that looked like a fairly simple design and I went to the drawing boards. After finishing my first beanie I was able to measure and create the different sizes right off the original template. And just like everything in the design world you learn by trial and error.

From there I went on to the hot pad, oven mitt and the apron. This was fairly easy after I sketched out the initial design of everything. After I sketch everything out in my design sketchbook I start the actual designing process which i am going to share with you today.

Recently I have really wanted to try and sew stuffed animals and create my own stuffed animals. I know there are many patterns out there that were designed fabulously!!! However because of my background in designing I LOVE the challenge of creating something from nothing. To me there is no bigger reward than seeing something come to life from the very start to the very end. Now I can't say that I will always do this. I know when I am ready to finally start making clothing I will definitely be hitting up my favorite designers and purchasing some of their AMAZING Patterns. Things like that were there is no leeway I just don't trust myself enough to know enough about how clothing is supposed to lye on the body and where it needs to be brought in. Just the thought intimidates me.

Anyway I wanted to share my process for those that are in my shoes but just need an idea on where to start.


The first thing I do after I sketch it in my book (or a piece of paper ) is take my erasable marker board and using a dry erase marker, I will draw out my shapes in the size I would like them. If i am doing a large project and need the whole space for one piece I will just repeat this whole process as many times as needed. The reason I start on the dry erase board is so that I can simply erase and redraw quickly without a mess of faded pencil lines and such.

After I I am finished drawing my pieces out on my dry erase board I trace over the marker lines with my Crayola Brand Dry Erase Crayons. Taking the time out to do this will ensure that your lines won't get smudged or wiped away.

After I am done tracing over my pieces with my dry erase crayon I tape a piece of wax paper over my board and retrace my design onto the wax paper. This will give me the paper piecing for my elephant template. After its all traced on the wax paper you can go ahead and cut it all out.

After you have your cut pieces of wax paper you can either pin that to your fabric and cut your fabric that way or you can take an extra step like I do to make a slightly sturdier and reusable template. What I do is take my wax paper and tape it to my thicker cardstock and retrace it and cut out my new sturdier template pieces.


Now from there I lay the cardstock on my paper carefully pinning in down in the center to keep in place and I take my pencil and lightly trace the outline of my template on to the back of my fabric.

Once again this process of designing is trial and error but its a fairly quick and easy way to get through the initial design process so that you can start sewing up your new creation. I hope this process will help when it comes to designing your own patterns.


I would love to hear about your pattern making processes.

Happy Crafting


Wednesday, January 9, 2013

Turning a Flat Sheet into a Single Panel Curtain


Hi everyone!!!! Finally the holidays are over and I am cleaned up. My house is nearly back to normal which means it was time for me to pull out the sewing machine again.


I know we have all come across it...You go to redecorate your kids rooms, new paint, new wall hangings, new sheets and pillow cases but wait NO MATCHING CURTAIN!!!!! Well this is what happened to a friend of mine. So she gave me a call and asked me what I could do to help. So I thought I would share.


GURR! Well here is a simple fix that I am sure everyone will like. Most parents I know when they buy the sheet sets for their kids beds don't put on the flat sheet. This usually just sits on the top shelf of the closet and wastes space. Why not use that matching sheet in replace of spending more money and trying to go through the burden of finding a matching curtain.


This process is very easy even for a beginner sewer. I left it as a single panel since we were not looking to be able to tie it back.


All I did was take the top part of the sheet and folded it over so that the already made seam in now in the back. I ironed it to hold it over Sew I could make a new seam at the top.


Once I finished the top seam I had sewn one more line at the bottom of the flap. This leaves me with a 2 inch hole to slip my curtain rod into.


That's it sew 2 strait lines and you have yourself a full length single pain curtain.


I have all venetian blinds here so I was not able to get it hung on a curtain rod. But I promise when she gets it up in her home I will revisit this and show you how it looked hung with all the other matching bedding in the
room. Perfect for any little sports fan!!!


Happy Sewing,


Looking Forward.....

As I sit here and dust off the cobwebs to my tiny ghost town of a blog, I am excited to make a fresh start and slowly get back to what...